Set up branded email sending (your domain)
Send campaigns from yourname@yourcompany.com — verify DNS (SPF/DKIM/DMARC), apply your logo and colors, and run a test send.
Go to Settings and open the Custom Domain panel. Enter the domain you want emails to come from (e.g. mail.yourcompany.com or yourcompany.com). We recommend a subdomain like `mail.` or `send.` so your root domain's email reputation stays isolated.
Was this step helpful?After you add the domain we show 3–5 DNS records: • SPF (TXT) — authorizes our servers to send for your domain. • DKIM (TXT, 1–2 records) — cryptographically signs each email so providers can verify it really came from you. • DMARC (TXT) — tells inboxes what to do with mail that fails SPF/DKIM (start with p=none to monitor). • Click-tracking (CNAME) — auto-issued so tracked links show your domain instead of ours. The block below auto-loads YOUR tenant-specific values — including your real DKIM public key — once you've added a custom domain in Settings. Until then we render generic placeholders. Use the per-record buttons: • Copy record — TXT/CNAME values, with confirmation toast. • Copy DKIM key — a dedicated, high-fidelity copy for the DKIM public key. The toast confirms the exact character count so you can verify nothing was truncated when pasting into your DNS panel.
Loading your tenant-specific DNS records…Was this step helpful?Open the DNS panel for your domain registrar and create each record exactly as shown. Quick links to the right page: • Cloudflare → DNS → Records → Add record (https://dash.cloudflare.com) • GoDaddy → My Products → DNS → Manage Zones (https://dcc.godaddy.com/manage/dns) • Namecheap → Domain List → Manage → Advanced DNS (https://ap.www.namecheap.com) • Google Domains / Squarespace → DNS → Custom records • Route 53 → Hosted zones → Create record Leave TTL at the default (Auto / 3600). On Cloudflare, set the click-tracking CNAME to DNS only (gray cloud) — proxying breaks open/click tracking.
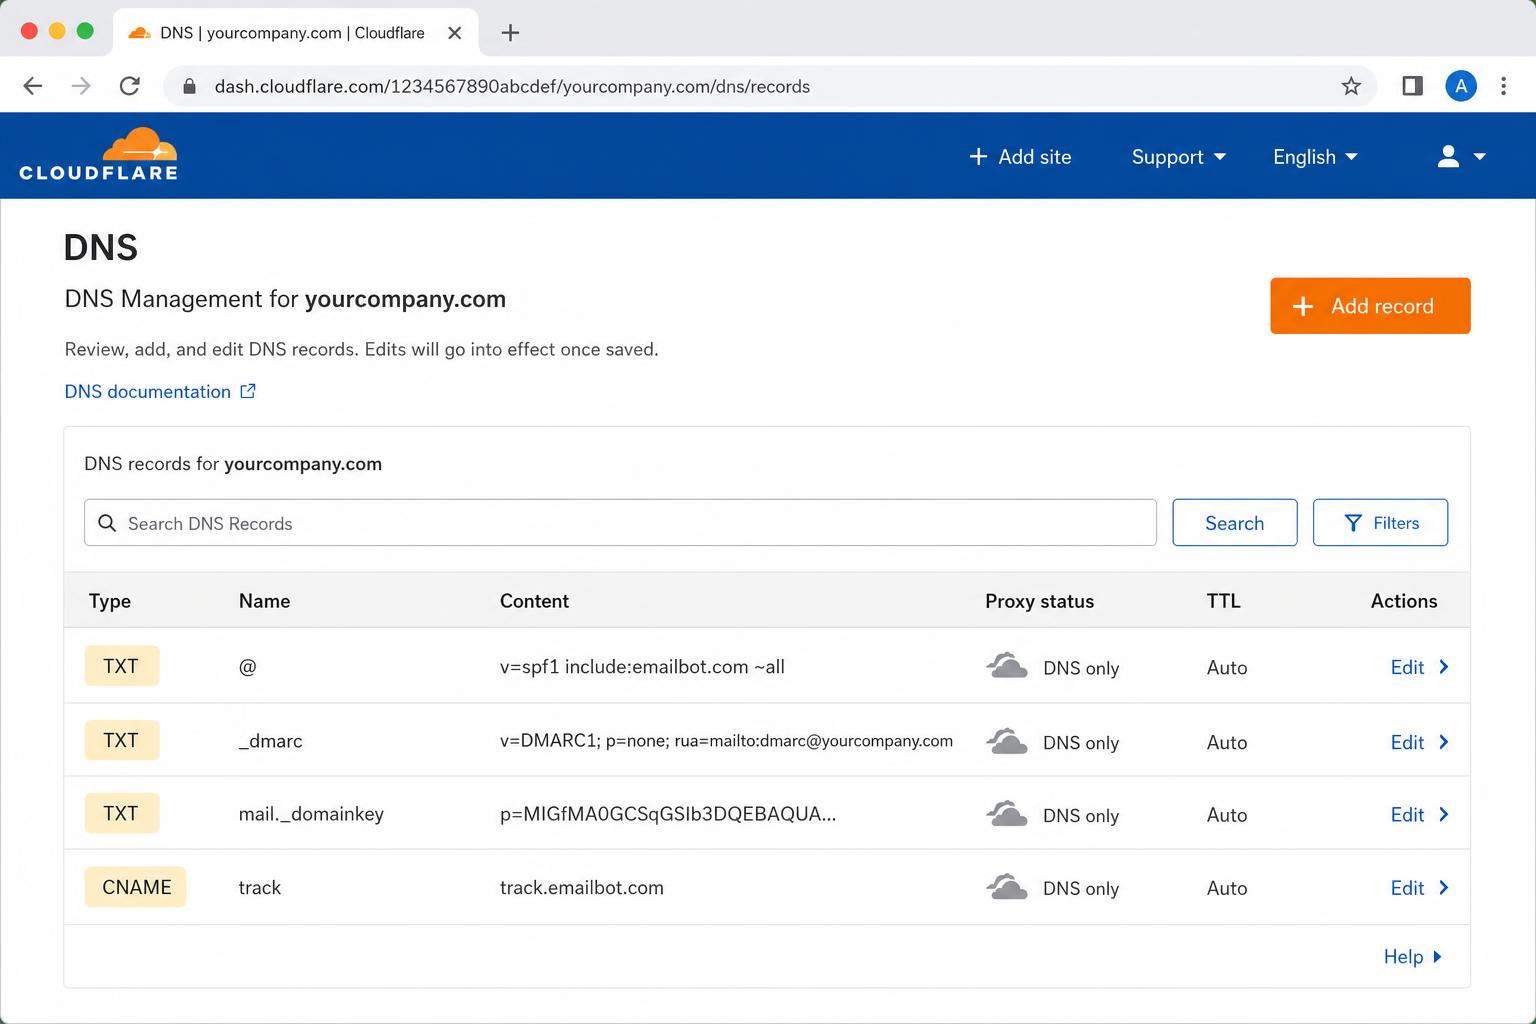
Cloudflare → DNS → Records. The 4 rows above must all match exactly. Keep the click-tracking CNAME on 'DNS only' (gray cloud) — proxying breaks tracking. 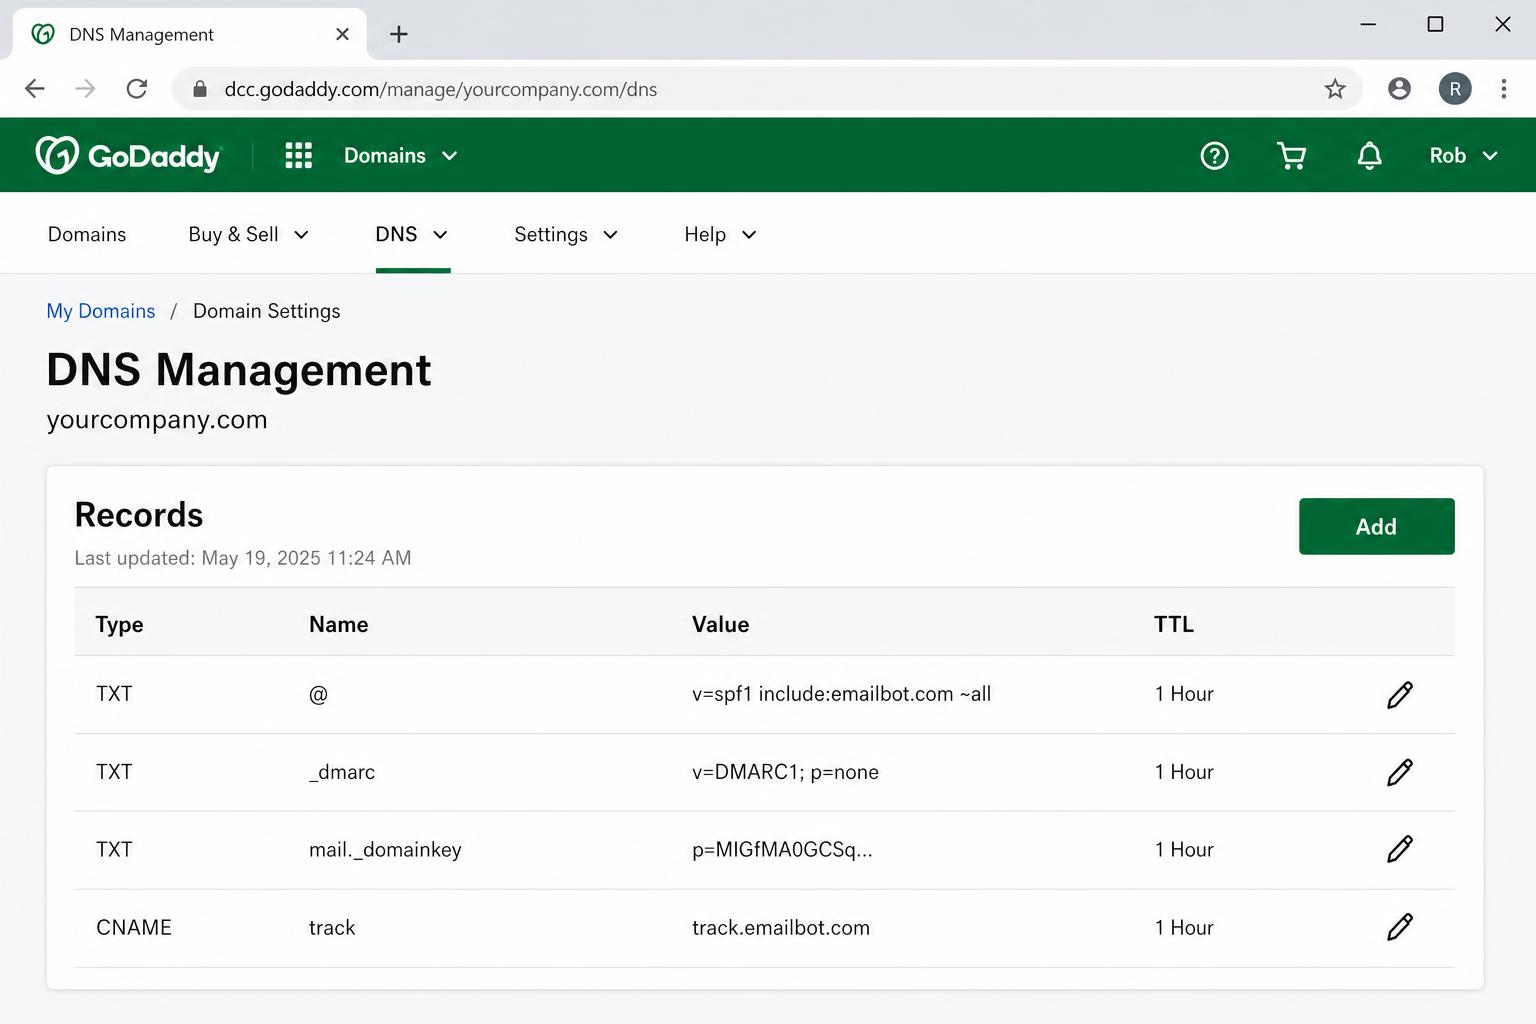
GoDaddy → My Products → DNS. Use the green Add button for each record. Leave TTL at 1 Hour. 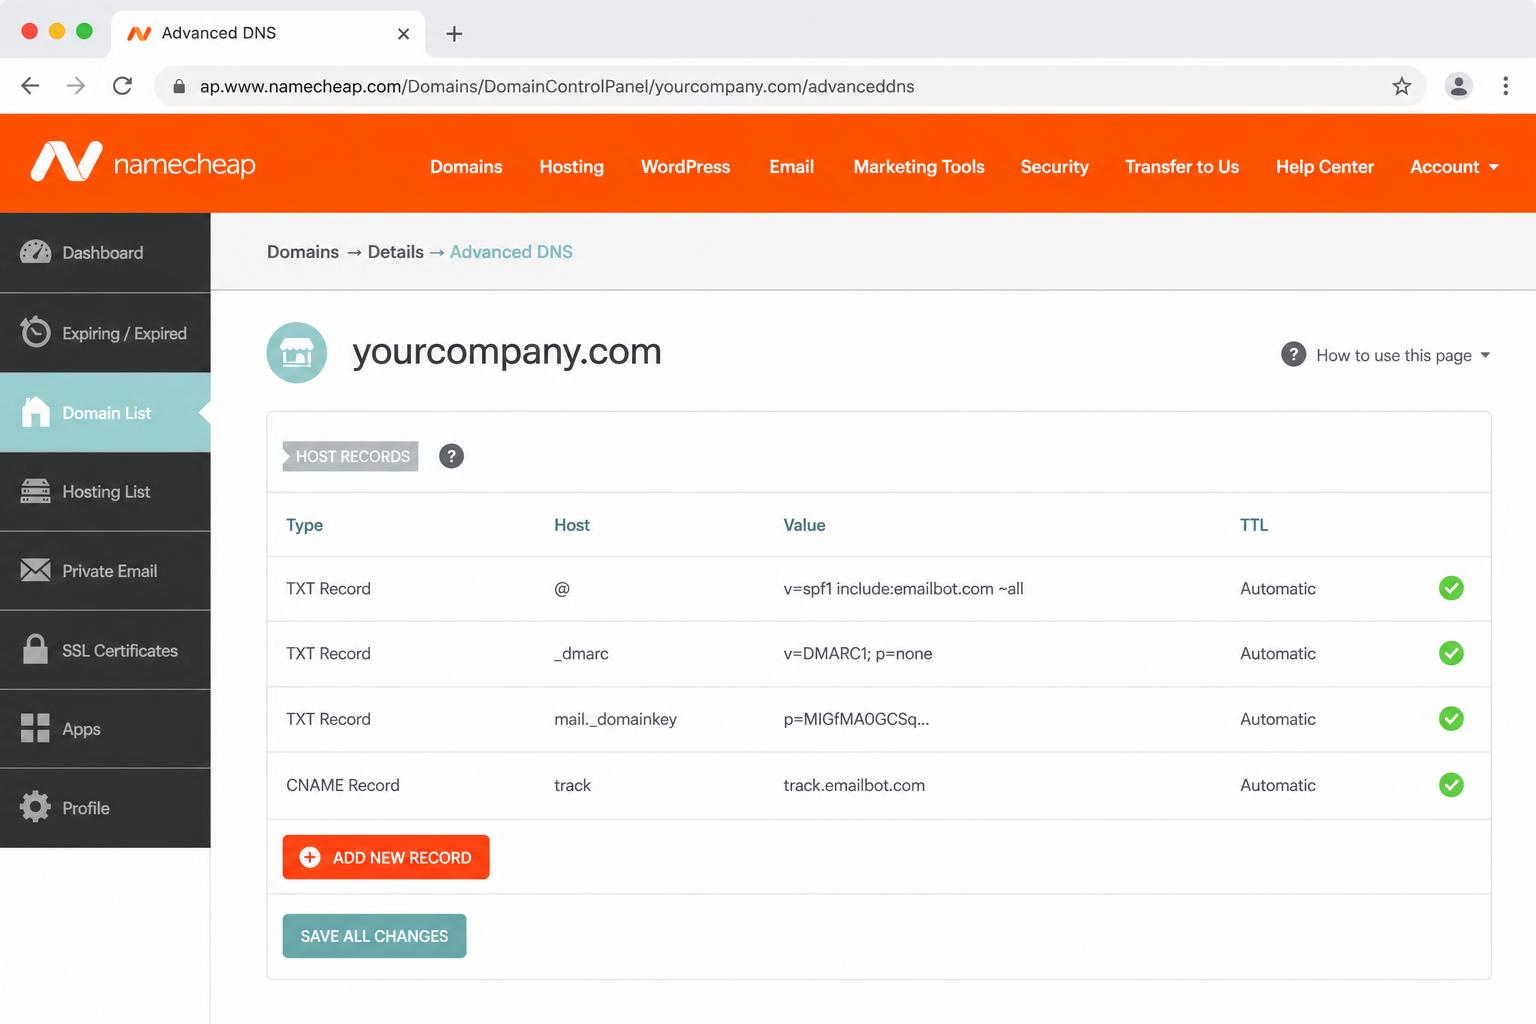
Namecheap → Domain List → Manage → Advanced DNS. The green check confirms the record was saved — don't forget 'Save All Changes'. Was this step helpful?Back in Settings → Custom Domain, hit Verify. Most providers propagate in 5–15 minutes; allow up to 72 hours in rare cases. The status pill turns green when SPF, DKIM and DMARC all pass. The Campaign send dialog auto-polls DNS verification while it's open. When the state flips (e.g. unverified → verified or partial → verified), a toast pops so you don't have to babysit the page. The toast is debounced and scoped to the dialog session — reopening or repeated polls returning the same state will not re-fire it. If it stays pending: recheck for accidental quotes around TXT values and that you didn't paste the record name twice (e.g. `mail.yourcompany.com.yourcompany.com`).
Was this step helpful?Go to Pro Features → White-Labeling → Email Branding: • Email header logo — appears at the top of every campaign and transactional email. • Custom email footer — replaces the default 'Sent via EmailBot' line. • Sender signature — appended below the body of every send. • Hide platform branding — Enterprise plans can fully remove our footer. The live preview now renders your UNSAVED logo, footer text, signature and 'hide platform branding' toggle exactly as they will appear in outgoing emails — so you can iterate without saving and re-sending. Settings are read at send time, so once you save, every queued email picks them up immediately — no redeploy needed.
Was this step helpful?Open any campaign and click 'Send test to me' on the send dialog. Check that: • The From: header shows yourname@yourdomain.com (not @emailbot.approfits.com). • Gmail shows 'mailed-by: yourdomain.com' and 'signed-by: yourdomain.com' in the message details. • Your logo, footer and signature render and the platform-branding toggle was respected. • The email landed in Inbox, not Spam or Promotions. If any of those fail, jump back to step 4 — usually it's a missing DKIM record.
Was this step helpful?The Test Send History panel logs every 'Send test to myself' attempt with provider, status, verified state and timestamps. From the panel you can: • Filter by search text, status and verified flag — the same filters are applied server-side when exporting. • Export current page as CSV — quick one-click download of what you see. • Export all matches — paginates the filtered Supabase query in the background, streams CSV chunks (memory-efficient for very large histories), shows a progress bar with a rolling-average ETA, and supports Cancel. – If you Cancel mid-export, we still download a partial CSV of the rows already fetched and show an explicit 'Export cancelled' toast with the salvaged row count. – Choose exactly which provider fields to include via the column picker — your selection is persisted in localStorage (key: `branded_test_sends.csv_fields.v1`) so it survives reloads. – Output is RFC 4180 compliant: CRLF terminators, properly quoted/escaped fields, and a formula-injection guard (leading `=`, `+`, `-`, `@` are prefixed) so the file opens cleanly in Excel and Google Sheets without macro warnings.
Was this step helpful?Every test send (manual or scheduled) is recorded in the DNS Verification History panel under Settings → Custom Domain → Test Send. Each row shows the SPF/DKIM/DMARC status badges, the run mode (manual or scheduled), the recipient and a timestamp. Click any row to open the run detail dialog, which surfaces: • Per-record pass/fail/unknown status with explanations. • The exact provider error message (if the test send failed). • The provider message_id so you can correlate with your inbox. The 'Last verified' line at the top is your at-a-glance health check — green means SPF, DKIM and DMARC all passed on the most recent run.
Was this step helpful?In the same Test Send panel, the Automatic re-verification block lets you keep your domain healthy without remembering to test: • Frequency — Off, Daily, or Weekly. • Recipient — the inbox that should receive scheduled test sends (e.g. ops@yourcompany.com). • Next run — shows the upcoming run time and how long ago the last run executed. A background job runs every 15 minutes server-side and processes any domain whose next_run_at is due. Results land in the same DNS Verification History list (mode = 'scheduled') so you can spot regressions early — for example, if your DNS provider rotates DKIM keys and a record breaks.
Was this step helpful?The Inbox page (sidebar → Inbox) consolidates everything that came back from your sends: • Replies tab — Gmail/IMAP replies polled in near real-time, deduplicated per thread. • Bounces tab — hard bounces, soft bounces and delivery failures captured from the email_send_audit table. Both tabs share: • A date range filter (last 24h / 7d / 30d / custom). • Full-text search across recipient, subject, and SMTP error code. • Pagination (25 rows per page) — page resets to 1 whenever you change a filter. Click any bounce row to open the Bounce Detail dialog: it shows the SMTP status, error code, error message, attempt index, the full raw provider response JSON and any captured headers/metadata. Use 'Copy raw JSON' for support tickets or postmortems.
Was this step helpful?Once you've sent for a couple of weeks with no auth failures in your DMARC reports, raise the policy: p=none → p=quarantine → p=reject. This blocks spoofers from sending fake mail as your brand. Use a reporting service (dmarc.postmarkapp.com is free) to read the XML reports.
Was this step helpful?Short answers to the issues users hit most often. Each answer points to the exact UI dialog or page where you'll resolve it. Q: My DMARC status keeps showing 'unknown' after a verify run. A: 'Unknown' means the provider couldn't get a definitive answer for that record (usually a TXT lookup that hasn't propagated yet, or a DMARC record published at the wrong host). Open the verification history in Settings → Custom Domain → Test Send, click the most recent row to open the Verification Run dialog, and read the per-record explanation under DMARC. If propagation is the cause, wait 5–15 minutes and re-run. If the record is wrong, fix it at your DNS provider (the record name must be exactly `_dmarc.yourdomain.com` and the value must start with `v=DMARC1`). Open: /sender-domain-auth (Test Send → Verification History → click latest run). Q: My Inbox Bounces tab is empty even though I know an email failed. A: Three things to check, in order: 1) Date range — the Bounces tab honors the date filter at the top. Switch to 'Last 30 days' or a custom range covering the failed send. 2) Search box — clear any recipient/subject/error code filter that might be hiding rows. 3) Outbox truth — open Outbox / Sent and find the row for that send. If its status is `sent`, the provider accepted it (no bounce yet — check the recipient's spam). If its status is `failed` or `bounced`, it should appear in Bounces; if it doesn't, refresh the page (the realtime subscription occasionally misses an event during reconnects). Open: /inbox (Bounces tab) and /outbox. Q: A test send failed — where do I see the actual error? A: Two places, depending on where you triggered the send: • From a campaign: open the Test Send History panel on the campaign send dialog. Each row's status badge is clickable and shows the provider error. • From Settings → Custom Domain: open the DNS Verification History list and click the failed run to open the Verification Run dialog — the 'Run error' block shows the exact error returned by the email provider (e.g. `Resend: domain not verified` or `SMTP 550 …`). For raw provider payloads on a real send (not a test), open the Inbox → Bounces tab, click the failing row, and use 'Copy raw JSON' from the Bounce Detail dialog. Open: /sender-domain-auth and /inbox. Q: The 'Last verified' line shows green but emails still go to spam. A: Authentication passing only proves the email is genuinely from you — it does not guarantee inbox placement. Check, in order: (1) the From: name and subject for spammy patterns, (2) that you have a working unsubscribe link (One-Click List-Unsubscribe header is added automatically), (3) your sending volume (warm up gradually — 20–50/day for the first week on a new domain), (4) DMARC reports for any auth failures from forwarders. Open: /pro-features?tab=email-branding to review your footer and signature. Q: Scheduled re-verification isn't running. A: Open Settings → Custom Domain → Test Send → Automatic re-verification. Confirm Frequency is Daily or Weekly (not Off) and a Recipient is set. The 'Next run' line shows when the cron job will pick it up — the background scheduler runs every 15 minutes server-side, so the actual send may happen up to 15 minutes after the displayed time. If 'Next run' is in the past and nothing is happening, save the schedule again to recompute next_run_at. Open: /sender-domain-auth. Q: A failed notification — can I retry it? A: Yes. Open the Notification Center, toggle 'Show only failed', and use the per-row Retry button or the bulk 'Retry on page' / 'Retry all' actions. Retries are audited (timestamp, count, error). Open: /notifications.
Was this step helpful?